Website

Website

1. Introduction

According to Oracle, 50% of customers want a business or service provider to stay accessible 24/7. Placing a chatbot on your website improves user experience by providing all-time support information.

Elitbuzz has made it extremely easy for you to deploy a chatbot on the website. 

1.1 Availability 

You can access web deployment by clicking on the ‘Edit Settings’ button under Configure>Deployment>Website Chatbot.

2. Deploy

There are two ways of using the chatbot:

2.1 Direct Link 

The direct link would open in a new tab when you click on the ‘Test Path’ button for the ‘Welcome new user path’ in the Builder section.

2.2 Website, Chatbot Widget on a Webpage 

In this mode, you include a simple javascript within your Webpage HTML. You can copy the script to be included from the Script within the Website Chatbot section. See below for reference:

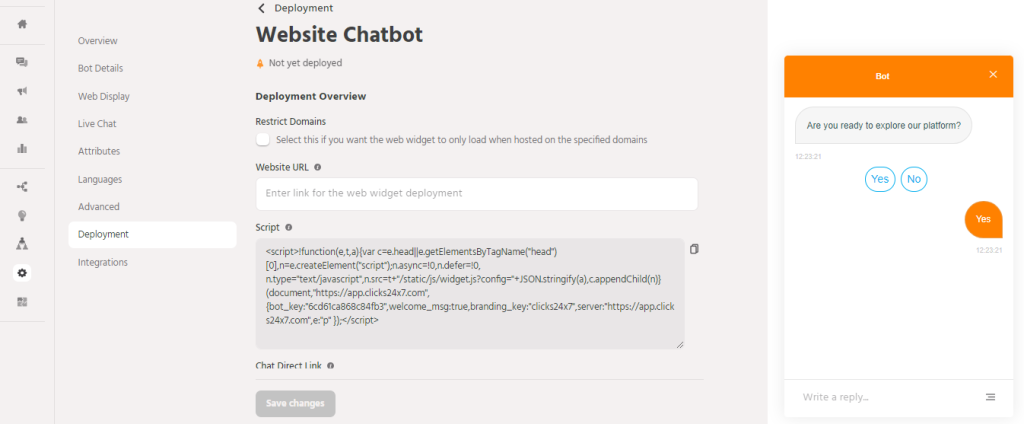
The script in the website Code :

2.3 Chat Position

Choose the position of the widget on the website.

Bottom Left Bottom right

2.4 Restrict Domain

Select this if you want the web widget to only load when hosted on the specified domains

3. Deploying the Chatbot on other Website Hosting sites

3.1 WordPress Website

  1. Log into your WordPress account, and open the “Website creation” section.
  2. Click on the plugin present on the left-hand side.
  3. Search for  “Header and Footer Scripts” and Install it.
  4. Copy the Script of your bot from your Elitbuzz account, the script will be available in the Deploy > Website Chatbot section.
  5. Add the Header and footer to your plugin, paste this script into the header section and save the file.

Note: Your WordPress account must be on a Business plan for this feature.

3.2 Magento 2 website

For adding custom scripts –https://magefan.com/blog/how-to-add-custom-code-in-html-head

  1. Navigate to Admin Panel > Content > Configuration.
  2. Choose the store view you want the head tag to be changed on or select Global in order to change it on every store view.
  3. Find the HTML Head section and add your code in the Scripts and Style Sheets field.
  4. Save on Click configurations.

3.3 Wix website

Please follow the below steps to add the Elitbuzz script

  1. Log in to your Wix account
  2. Select Edit Site
  3. Click on Add Apps
  4. Search for HTML and choose « HTML iFrame/Embed » from the Wix App market
  5. Add it to your site
  6. A window pops up. Double click on the window or select the Enter Code option.
  7. Select the Code option  
  8. Copy the script from the Elitbuzz Deploy, Website Chatbot section and paste the script here

Alternatively, use the below steps for the new version of the Wix websites

  1. Log in to your Wix account
  2. Select Edit Site
  3. Click on ‘Add’ from the panel
  4. Navigate to ‘Embed’ and select ‘Custom Embeds’
  5. Click on ‘+’ Add to site icon, next to ‘Embed a widget’
  6. A window pops up. Double click on the window or select the Enter Code option.
  7. Select the Code option  
  8. Copy the script from the Elitbuzz Deploy, Website Chatbot section and paste the script here

3.4 Cargo.sites website

  • Each Cargo site contains a Custom HTML Editor where you can add HTML and JavaScript. Access is via the Design tab.
  • Copy and paste the Bot script with <script> and </script> at the beginning and end of the website.

Note: The script will be applied to all the pages of your website.

If you want the bot script to work only on particular pages then you can add HTML for a specific page only, and open the Code View window via the Formatting Toolbar of that page.

3.5  Shopify website

  1. Go to your Shopify admin site
  2. Here you have to click on “Customize theme”
  3. Click on “Customize”
  4. Upon opening the “Themes” section, you will be able to see the “Customize” button on the right side of the screen, click on it.
  5. Click on Edit code.
  6. Click on the “{/} theme. liquid”
  7. Here you have to go to the “Layout” folder and click on it to display a .liquid files list, now click on “{/} theme.liquid”, this will automatically generate a code file on the right side of the screen.
  8. Find  </body> section
  9. Here you can add your Javascript code, just above the “</body>” section, In this example, I added the following in order to show you how it works.
  10. Refresh the screen and your chatbot should reflect on your website.